Obsolete
For the most up to date information, please visit https://wfview.org/wfview-user-manual/
OLD INFORMATION
wfview is written such that most features should be pretty obvious just by their labels or perhaps a little experimentation. However, if you are curious about more details, read on!
Main view:
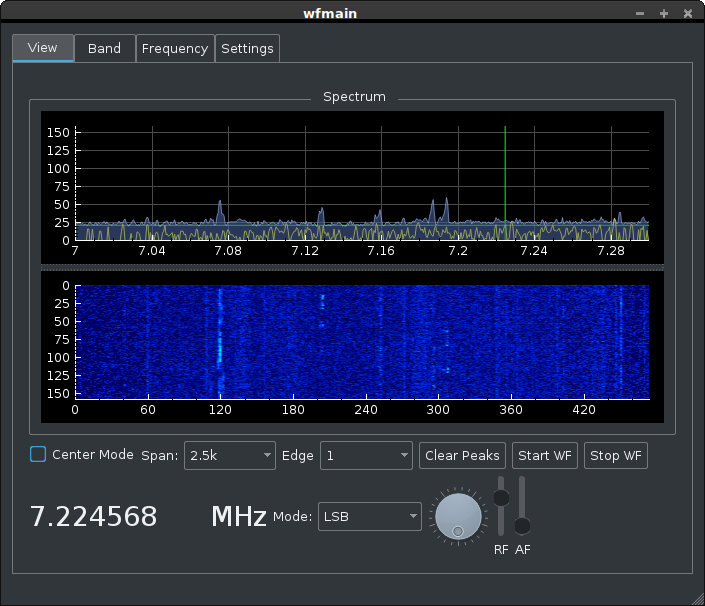
This is the main tab and view for wfview. From this screen, you can adjust the waterfall display, change the radio's mode, frequency, AF gain, and RF (receive) gain.
The center divider, between the "plot" at the top and the "waterfall" at the bottom can be dragged vertically if you prefer to see more of the waterfall or more of the plot. To adjust the bounds of the waterfall and plot, use the Edge and Span (center) options. Edge allows you to select between the three edge presets on the IC-7300, typically the CW portion, Phone portion, or the entire portion of the band. If "Center Mode" is checked, then one can select the desired span, in Khz, to either side of the center, using the pop-down menu. These are all the same controls that one finds at the screen of the IC-7300.
To clear the peaks of the plot at the top, press "Clear Peaks". To pause the waterfall display, press "Stop WF". To start again, press "Start WF". This option is here because it can be useful to stop the display all together when viewing remotely if the link isn't fast enough. You can also use this feature to grab a screenshot of something before it scrolls off the display.
To jump to a signal, simply double-click on the waterfall. If you just want to get a fix on what frequency a signal is, you can single-click on the waterfall and the frequency will be reported at the bottom of the window in the status bar.
The large circular knob can also be used to change frequencies. It can either be dragged around, or, the scroll wheel of the mouse can turn the knob simply by placing the mouse over the control and rotating the scroll wheel. If you hold down shift or control while scrolling here, the step size increases to 1Khz rather than the default 100 Hz. You can also do the same using the + and - keys, such as on a numeric keypad. Page up and Page down allow one to just surf by the MHz. Icom should have put those buttons on the front of the rig!
To select a mode, use the Mode pop-down menu. You can also just hit the "/" key to cycle between the most common of these modes.
To switch from full-screen to windowed mode, just press F11 or toggle the setting on the Settings tab.
You'll notice there are some other tabs at the top of the window. You can switch tabs by clicking of course, or you can use the F1, F2, F3, and F4 keys. For the convenience of folks using a numeric keypad, the star key ("*") jumps right to the Frequency tab and focuses the input on the frequency input box.
The Band tab:
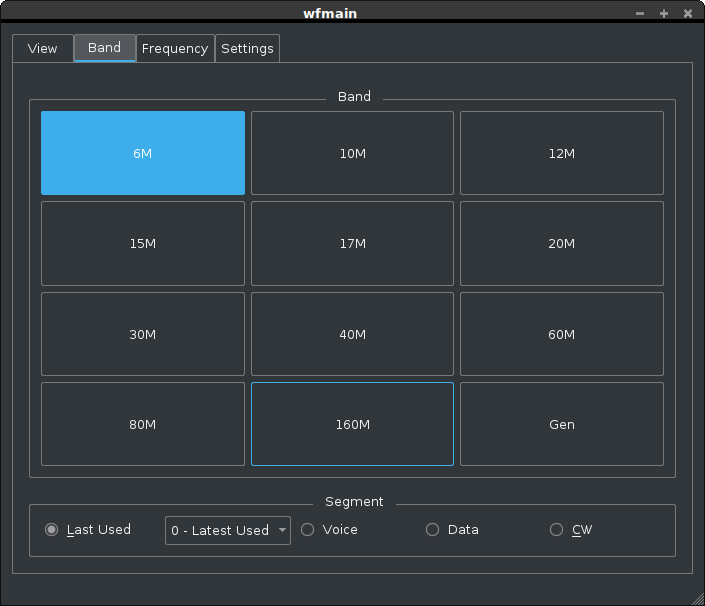
This tab is pretty self-explanatory. Each button corresponds to a ham radio band. It is basically the same as if one long-presses on the MHz part of the frequency on the IC-7300 display and gets to the "band stacking" register. The bottom pop-down menu lets you select if you will be jumping to the most recently used frequency on the selected band, or one that was used further back in the stack. Each button has a keystroke. I had to get creative with the keystrokes, and you can read about them on the keystrokes page of the wiki. For 60 meters, the IC-7300 doesn't have a band stacking register that I can tell, so it just takes you to the first 60M channel. If you have a suggestion on how to implement this better, I'd love to hear it.
The Frequency tab:
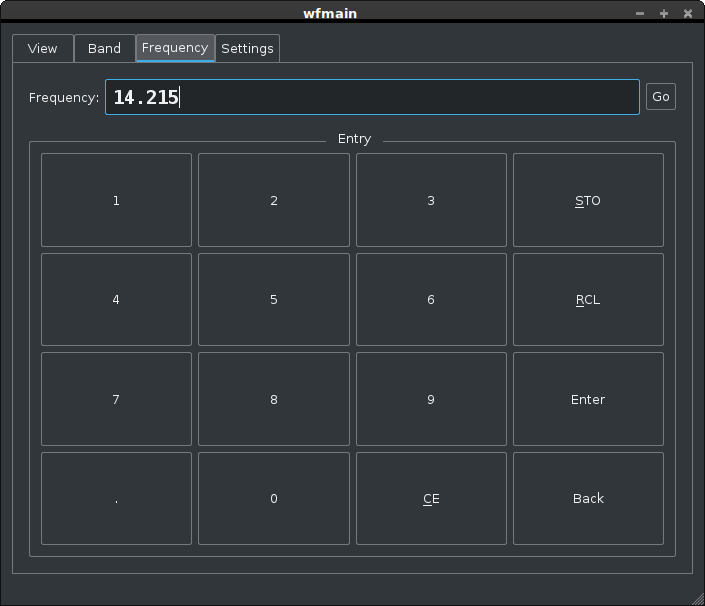
Like the band tab, this tab is pretty simple. Key in the frequency you want, either using the keyboard or by pressing the buttons. Now press Enter. Done. If you want to store a preset, first get the radio to the mode and frequency desired. Once you have that, just type in the preset number and then hit "STO". To recall, type the preset number and hit "RCL". If you ever used an RPN calculator, you already know how to do this. Presets are saved, by the way, in the preference file in plain text. Do be sure and press the "Save Settings" button on the settings tab if you modify the presets. The plain text file is located in ~/.config/eliggett/wfview.conf. I am sorry that the presets are not written to the file in any kind of logical order, and it appears the only way to change it is for me to roll my own preference class... This frequency tab, by the way, works great from a touch screen. That's why the "Back" and "CE" buttons are here -- needed if you don't have a keyboard.
The Settings tab:
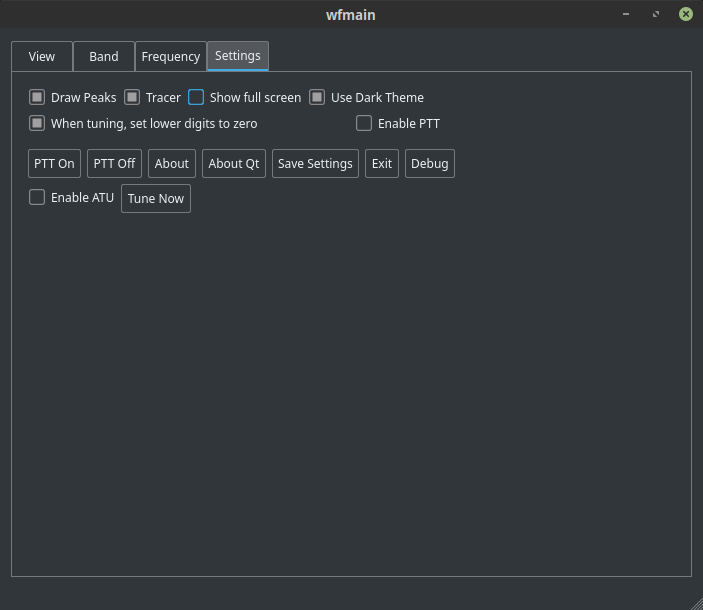
From this tab, you can adjust radio and wfview settings.
The "Draw Peaks" option toggles the persistent "peak hold" feature of the plot on the main tab. If you don't like peaks, just turn it off. The "Tracer" option toggles the tracer that follows the center frequency in the plot. "Show full screen" toggles full screen mode, and pressing "Save Settings" will preserve these settings for the next launch of the program. If you are building a dedicated Raspberry Pi as a display for your IC-7300, set the full screen mode to be the default and place wfview in your desktop environment's startup file.
"Use dark theme" switches between your system's default stylesheet (often selectable as a "theme" in your desktop environment's control panel), to a built-in stylesheet. Advanced users will note that a custom stylesheet may be specified using the plain text preference file (wfview.conf).
The "When tuning, set lower digits to zero" toggle causes the sub-100 Hz digits to be zero. This is almost always desirable.
"Ptt on" and "PTT off" are convenient ways to manually toggle the PTT state of the radio. Make sure to check the "Enable PTT" checkbox if you want to use the PTT from here. wfview has a built-in 3 minute timer for transmission time, which is only enforced if you are using wfview to actually run the PTT. If you are using fldigi or flrig or the radio, wfview minds its own business.
To use the IC-7300's built-in antenna tuner, check the "Enable ATU" checkbox, and then press the "Tune Now" button. wfview will poll the radio while it tunes the antenna, and the status (success or failure) will be reported in the status bar at the bottom of the window. Use Control-U to tune the antenna any time from the main tab.
"About" shows you a dialog box. One interesting thing in the box is that it will tell you when the program was compiled and from what gitlab hash. "About QT" tells you about the QT library.
"Save Settings" causes the settings to be saved, and "Exit" closes the program. You can also exit with Control-Q.
There are many more settings, such as serial port device and custom colors, that can be adjusted from the plain text settings file. Explore this file for more interesting things to adjust. I have even included some standard colors defined in the file so that you can see how colors are encoded.