2018-09-20 03:17:37 +00:00
|
|
|
This is the firmware for the TNC3 version 2.1.1 hardware.
|
|
|
|
|
|
|
|
|
|
# Building
|
|
|
|
|
|
|
|
|
|
Use Eclipse with CDT and the GNU MCU Eclipse plugins.
|
|
|
|
|
|
|
|
|
|
# Debugging
|
|
|
|
|
|
|
|
|
|
Logging is enabled in debug builds and is output via ITM (SWO). The
|
|
|
|
|
firmware is distributed with an openocd stlink config file that enables
|
2019-01-12 20:54:09 +00:00
|
|
|
ITM output to a named pipe -- `swv`. You must create this pipe in the
|
|
|
|
|
top level directory.
|
2018-09-20 03:17:37 +00:00
|
|
|
|
|
|
|
|
To read from this pipe, open a terminal and run:
|
|
|
|
|
|
|
|
|
|
`while true; do tr -d '\01' < swv; done`
|
|
|
|
|
|
|
|
|
|
If you change the MCU's core clock, you need to adjust the timing in the
|
2018-09-22 02:06:06 +00:00
|
|
|
`stlink-tnc3.cfg` config file.
|
|
|
|
|
|
2019-01-12 20:54:09 +00:00
|
|
|
# Installing firmware
|
|
|
|
|
|
|
|
|
|
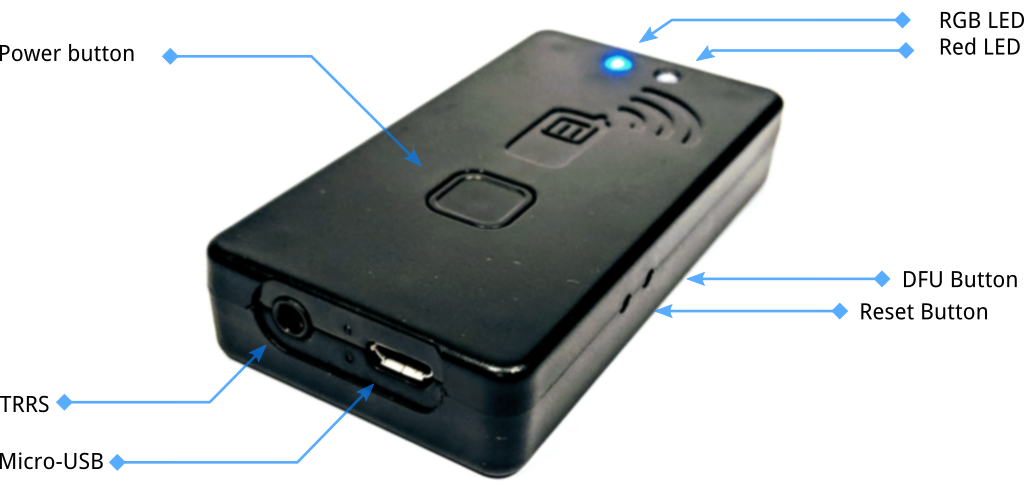
Firmware can be installed via the on-board ST/LINK port or via USB DFU.
|
|
|
|
|
|
|
|
|
|
## USB DFU
|
|
|
|
|
|
2019-01-21 21:06:27 +00:00
|
|
|
1. Download the STM32CubeProgrammer.
|
|
|
|
|
https://s3.amazonaws.com/mobilinkd/en.stm32cubeprog-1.4.0.zip
|
|
|
|
|
This programmer will work on Linux, OS X, and Windows.
|
2019-01-12 20:54:09 +00:00
|
|
|
|
2019-01-21 21:06:27 +00:00
|
|
|
2. Download the ELF file from the release (or that you have built from source).
|
2019-01-12 20:54:09 +00:00
|
|
|
|
2019-01-21 21:06:27 +00:00
|
|
|
3. Plug the TNC into a USB port and turn the TNC on. You should see a USB serial port enumerated.
|
2019-01-12 20:54:09 +00:00
|
|
|
|
2019-01-21 21:06:27 +00:00
|
|
|
4. Put the TNC into DFU mode by pressing the DFU button on the side. The TNC
|
2019-01-12 20:54:09 +00:00
|
|
|
will only enter DFU mode when plugged into a USB port.
|
|
|
|
|
|
2019-01-21 21:11:39 +00:00
|
|
|
|
2019-01-21 21:06:27 +00:00
|
|
|
|
2019-01-12 20:54:09 +00:00
|
|
|
***There is no visible indication on the TNC that it is in DFU mode***
|
|
|
|
|
|
2019-01-21 21:06:27 +00:00
|
|
|
5. You should see the serial port device go away and a new DFU device appear.
|
2019-01-12 20:54:09 +00:00
|
|
|
|
2019-01-21 21:06:27 +00:00
|
|
|
6. Run the STM32CubeProgrammer from the command-line. (Replace "firmware.elf" with the appropriate firmware filename.)
|
2019-01-12 20:54:09 +00:00
|
|
|
|
2019-01-21 21:06:27 +00:00
|
|
|
./STM32_Programmer_CLI -c port=USB1 -d firmware.elf -v -g 0x8000000
|
2019-01-12 20:54:09 +00:00
|
|
|
|
2019-01-21 21:06:27 +00:00
|
|
|
7. When that is complete, the DFU device will disappear and the serial port
|
2019-01-12 20:54:09 +00:00
|
|
|
device will re-appear.
|